Fgtech Galletto 4 V54 Windows 7 has been tested to work perfect. But for some users, there are some troubles after Galletto v54 installation, e.g. Galletto 4 v54 won’t start/run after install. Here is the how-to’s and FAQs of Fgtech V54 Windows 7 installation.
THE MOST IMPORTANT:
You have to REMOVE ALL OLD FGtech FILES from the system before installing Galletto V54.
Guides: How to install Fgtecg Galletto V54 Windows 7
In the video Fgtecg v54 is installed on Windows XP. But the same method to Windows 7.
Step 1: Insert the Fgtecg v54 CD software into computer
step 2: Open “My Computer”, then “FG TECH V54 (E:)”
step 2: Open “My Computer”, then “FG TECH V54 (E:)”
Step 3: Open and install “FGtech Galletto Edited v1.0 Galletto setup”
Follow the system prompt:
Click on “Next” to install Galletto setup wizard-> Select “Destination location to C://FGTech”->Tick Create a desktop icon” and “Create a Quick Launch icon” on desktop
Click on “Next” to install Galletto setup wizard-> Select “Destination location to C://FGTech”->Tick Create a desktop icon” and “Create a Quick Launch icon” on desktop
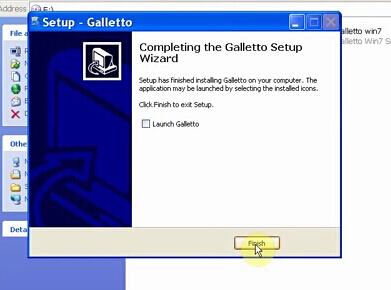
Step 4: Untick “Launch Galletto”, click on“Finish” when complete installing wizard
step 5: Select “Install from a list or specific location (advanced)”
step 5: Select “Install from a list or specific location (advanced)”
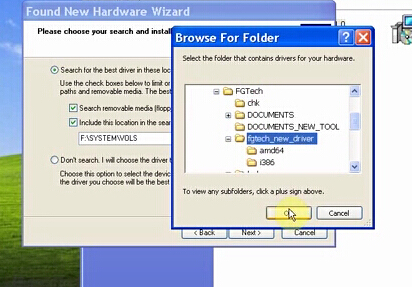
Step 6: Browse and save files to “C://FGTech//fgtech-new-driver”
Step 7: Open Galletto v54 software on the desktop
The system will display a WinLicense prompt “This application has been registered to dragan xp”, click on “OK” button to continue
Step8: Re-install “FGtech Galletto Edited v1.0 Galletto setup” again, follow the same above procedure or simply follow system prompts
The system will display a WinLicense prompt “This application has been registered to dragan xp”, click on “OK” button to continue
Step8: Re-install “FGtech Galletto Edited v1.0 Galletto setup” again, follow the same above procedure or simply follow system prompts
This time tick “Launch Galletto” and click “Finish” button if wizard is completely installed
Press “OK” when EOBD message displays
Launching FgTech Galletto software, accept EOBD2 warning message
Launching FgTech Galletto software, accept EOBD2 warning message
Now Fgtech Galletto v54 is ready for use!!!!!!!!!
Step 9: Select a Galletto language
Languages available: Italian, English, Dutch, French, Spanish, Portuguese, Czech, Turkish
Step 9: Select a Galletto language
Languages available: Italian, English, Dutch, French, Spanish, Portuguese, Czech, Turkish
Step 10: Select the vehicle make, model, ECU type to read/write ECU
Galletto V54 Windows 7 FAQs:
Question: Galletto 4 v54 Error shown as below:
C:\FGTecg\EOBD.exe
An error occurred while trying to rename a file in the destination directory:
MoveFile failed: code 2
The system cannot find the file specified
Click Retry to try again. Ignore to skip this file (not recommended), or Abort to cancel installation
Answer: Follow the steps here:
- Run “FGTech Galletto Edited v1.0.exe” as an administrator. Important: Do not create a desktop icon and run the program yet.
- Next, connect the Galletto device to the power supply and then connect it via USB. The automatic driver installation fails. But do not worry, the installation is done manually.
- Right-click on the “Computer” icon and select “Manage”. As soon as the window opens, click on Device management and select the USB port “FGTech”. Here you have to click “Update driver software”. And then click “Browse the computer for driver software”, then “Select from a list of device drivers on the computer”, then “Have Disk” and “Browse”.
- Now look for the folder of “FGTech” on drive C. Here you open the folder “fgtech_new_driver” and select the following file: “fgtibus.inf”! Confirm everything, wait for the installation, and close all windows.
- Run “FGTech Galletto Edited v1.0.exe” again as an administrator. Important: Do not create a desktop icon and run the program yet.
- Run “Galletto win7.exe” as administrator. Create and install the desktop icon. If the installation is complete, start the program as an administrator.
- Ignore the next two windows with hints and confirm with OK.
FINISHED!!!
Question: Fgtech v54 won’t start after installation
Answer: Start with steps here:
First,
do a fresh install of windows
Second,
remove the old fgtech from system totally
That is, you need to remove all previous installs system files of fg
Third,
check your fgtech drive, check if all is well, there’s driver for 32bit and 64bit. (if you uninstall all previous versions). Use the USB fix that comes on the cd.
If Fgtech v54 not open in OBD2, re–install again without deinstalar the v54. and try to open the Obd2 again.
If Fgtech v54 not open in OBD2, re–install again without deinstalar the v54. and try to open the Obd2 again.
Fourth,
check ftd2xx.dll file. If this file was read only and you have to change this unmarking read only in location – widows/system32/ftd2xx.dll.
Now is working !!!!!!!!
Question: Need re-install v54 software in a loop. (after 1 use)
Answer: Solution is very simple, tested on win XP. Maybe ok to win 7. have a try and good luck!
Answer: Solution is very simple, tested on win XP. Maybe ok to win 7. have a try and good luck!
Install everything in usuall way. You dont have to waste your time with removing drivers etc.
Start the software, 1st time after installation. It will start fine.
But before you press “exit” in bottom left corner, just disconnect galleto from usb. Wait 1-2s (untill all fields grey out, without device connected).
Exit software. DONE
After every use of software before you click exit, just remove usb (disconnect v54 from pc). Wait 1-2s. Press exit
Simple as that, better than re installing all the time same software…
Question: where can I find a manual to know how to use the cables that it brings?
Answer: Check in menu of galetto software, there is some link to pdf. you have manual for obd, bdm, boot mode,…. Just read and you can find a lot of responses to your answers
Question: Can i install Galletto v54 on Windows 8?
Answer: Make sure you have the right/latest FTDI drivers for win8 installed too. Get the latest from http://www.ftdichip.com , then install the device drivers.
Then launch the program after you have connected the device.
Then launch the program after you have connected the device.
Question: Have anyone to share the right installation method , step by step, for fgtech 4 v54 china clone?
Answer: FGTech Galletto 4, V54 Install notes
Windows XPRun FGtech Galletto Edited v1.0 2 times.
First time, run without launch option in the end.
Second time, run with launch option in the end. Before launch, you must plug the Galletto 4 device.
Windows XPRun FGtech Galletto Edited v1.0 2 times.
First time, run without launch option in the end.
Second time, run with launch option in the end. Before launch, you must plug the Galletto 4 device.
Windows 7 32 bitsRun FGtech Galletto Edited v1.0 2 times.
First time, run without launch option in the end.
Second time, run with launch option in the end. Before launch, you must plug the Galletto 4 device.
After the steps below, install Galletto win7 with the device pluged. Launch the program from Galletto win7 icon on desktop . It works fine
First time, run without launch option in the end.
Second time, run with launch option in the end. Before launch, you must plug the Galletto 4 device.
After the steps below, install Galletto win7 with the device pluged. Launch the program from Galletto win7 icon on desktop . It works fine
Enjoy!


