Here is the instruction on writing stately PCR 2.1 with Fgtech Galletto 4 V54 master clone for those who do not have original tools. All you need it's UPA USB and Galletto V54 China clone!
Credits to Mr. mercas who made this tutorial.
On forum exist a lot of threads with bricked ecu's because Galletto,Kess or other tool don't unlock ok every time this ecu on bootmode,
or ecu was already unlocked by another tuner.
This steps were tested by 3 PCR ECU's from 3 different years and all was ok.
How to write safety PCR 2.1 with Galletto v54 China clone!
1. Read flash OBD with fgtech v54 clone;
2 Open ecu Carefully!! and put it back to car to test if you don't destroy it when you open;
3 read eeprom 25640 with 2 different programmers(i used upa and xprog M), and compare it;
4 unlock with program PCR2.1-Simos8 Unlock 1.1 25640 eeprom (Search it on MHHAUTO forum);
5 solder eeprom back;
6 start car;
7 go with VCDS look variable Measuring block 497;
If production it's locked;
If sample then unlocked ;
8 read flash again by obd(it will be the same like first read);
9 modify files and make checksum with winOLS;
10 write flash by OBD, if fail, write original without read id data;
Here is a manual way how to do the unlock in Winols:
open the eeprom (25640) on winols
choose the decimal mode
and 16 bit
go to the address 24A
24A 24C 24E and 250
we will calculate this 4 value
you will 65535 - 24A value
write it to 24A
for example on my file 17052 is 24A value
65535 - 17052
48483
you will write 48483 to 24A
the you will do it same for 24C
65535 - 24C = will new value
for example in my file 34224 is 24C value
65535 - 34224 = 31311 is new value for 24C
you will calcuate this 4 value
and save and write the file
after do that
to be sure
calculate the all 4 values ori and tuned


4/06/2017
How to Install Fgtech Galletto V54 on Windows 7 Step by Step
Here is the customer final solution for the Fgtech Galletto 4 V54 master ecu tuning kit installation with windows 7
Install FGTech Galletto V54 correctly with Windows 7
Hello, I would like to explain to you step by step how to install your FGTech V54 correctly with Windows 7. To do this, you must first uninstall the already installed software and the drivers. Then we start with step:
1. Run "FGTech Galletto Edited v1.0.exe" as an administrator. Important: Do not create a desktop icon and run the program yet.
2. Next, connect the Galletto device to the power supply and then connect it via USB. The automatic driver installation fails. But do not worry, the installation is done manually.
3. Right-click on the "Computer" icon and select "Manage". As soon as the window opens, click on Device management and select the USB port "FGTech". Here you have to click "Update driver software". And then click "Browse the computer for driver software", then "Select from a list of device drivers on the computer", then "Have Disk" and "Browse".
4. Now look for the folder of "FGTech" on drive C. Here you open the folder "fgtech_new_driver" and select the following file: "fgtibus.inf"! Confirm everything, wait for the installation, and close all windows.
5. Run "FGTech Galletto Edited v1.0.exe" again as an administrator. Important: Do not create a desktop icon and run the program yet.
6. Run "Galletto win7.exe" as administrator. Create and install the desktop icon. If the installation is complete, start the program as an administrator.
7. Ignore the next two windows with hints and confirm with OK.
FINISHED!!!
http://blog.obdii365.com/2017/04/06/install-fgtech-galletto-4-v54-on-windows-7/
Install FGTech Galletto V54 correctly with Windows 7
Hello, I would like to explain to you step by step how to install your FGTech V54 correctly with Windows 7. To do this, you must first uninstall the already installed software and the drivers. Then we start with step:
1. Run "FGTech Galletto Edited v1.0.exe" as an administrator. Important: Do not create a desktop icon and run the program yet.
2. Next, connect the Galletto device to the power supply and then connect it via USB. The automatic driver installation fails. But do not worry, the installation is done manually.
3. Right-click on the "Computer" icon and select "Manage". As soon as the window opens, click on Device management and select the USB port "FGTech". Here you have to click "Update driver software". And then click "Browse the computer for driver software", then "Select from a list of device drivers on the computer", then "Have Disk" and "Browse".
4. Now look for the folder of "FGTech" on drive C. Here you open the folder "fgtech_new_driver" and select the following file: "fgtibus.inf"! Confirm everything, wait for the installation, and close all windows.
5. Run "FGTech Galletto Edited v1.0.exe" again as an administrator. Important: Do not create a desktop icon and run the program yet.
6. Run "Galletto win7.exe" as administrator. Create and install the desktop icon. If the installation is complete, start the program as an administrator.
7. Ignore the next two windows with hints and confirm with OK.
FINISHED!!!
http://blog.obdii365.com/2017/04/06/install-fgtech-galletto-4-v54-on-windows-7/
2/15/2017
Fgtech write chevrolet EDC16 C39 sk2 error solution
Problem:
I have a problem with a write of a Chevrolet cruze EDC16 C39 with fgtech galletto v54 ecu programmer by obd. But i have the error message sk2 at 13% or write. I need helpp please?
Solution from obdii365.com engineer:
Take the fuse nº 2. Problem has been solved.
I have a problem with a write of a Chevrolet cruze EDC16 C39 with fgtech galletto v54 ecu programmer by obd. But i have the error message sk2 at 13% or write. I need helpp please?
Solution from obdii365.com engineer:
Take the fuse nº 2. Problem has been solved.
11/27/2016
Read Iveco EDC7UC31 by FGTech Galletto and Ktag
Here are two optional solutions of how to read Iveco EDC7UC31 Bosch ECU by using FGTech galletto and Ktag ksuite v2.10 respectively.
This is the Iveco truck ECU Bosch EDC7UC31 to read:

Solution 1: Ktag v2.10 read EDC7UC31 Bosch ECU
Tested with Ktag master ecu tuning kit firmware v5.001 and ksuite v2.10 software from obdii365.com

Here goes to the ecu reading process…
Select truck-> Iveco truck-> Cursor B-> Bosch EDC7UC31 to read the ecu data


Note: there are lots of Ktag clones with different firmware & software versions. Some are designed for cars, some for trucks. But sometimes even the truck version fails to do on trucks. So the real fact only can be learned by testing yourself, with luck.
Solution 2: FGTech 2 & special adapter read Iveco EDC7UC31 without issues
The FgTech galletto 2 master ecu programmer is offered by obdii365.com also.
The process of EDC7UC31 ecu reading…


Note: EDC7UC31 ecu reading through galletto needs luck. Some people in forums said they failed to this. Even the experienced
– So which ecu programmer you should choose to read EDC7UC31 ecu?
– It depends. Both can read EDC7UC31 successfully, with disassembling the ecu. Here list some aspects for you to think about your purchase.
Price:
K-tag v2.10: $79.00
Fgtech 2: $29.99
Reading speed:
Ktag: about 5 minutes to complete the ecu reading
Fg tech: about 3 minutes for it
–> Conclusion:
They both work good, but KTAG runs without tokens limitation, perfect with checksum, compared with FGTech.
Good luck when reading EDC7UC31 ecu.
11/14/2016
Flash EDC16 & Me9 ECU by Fgtech Galletto via BDM
Have tried to flash EDC16 with KESS V2 clone, but i can not see anymore HW and VIN from the EDC16 ECU and the car not starts! Then worked with Fgtech Galletto v54 master, all EDC 16 on BDM without any problem… (BIG thanks to maki1)
Here is what i did with the EDC16U34 from VAG ECU, using Fgtech galletto v54.
The BDM pad here


Now carefully align with the adapter springs drop and secure frame


Open FgTech software
Make sure you have 12v+ feeding FG Tech and the intermediate adapter


Switch the intermediate adapter ON
Red LED will illuminate


Click on Select Driver-> BDM/Jtag-> Connect


If everything is ok, the green bar will start loading and finally display ECU info
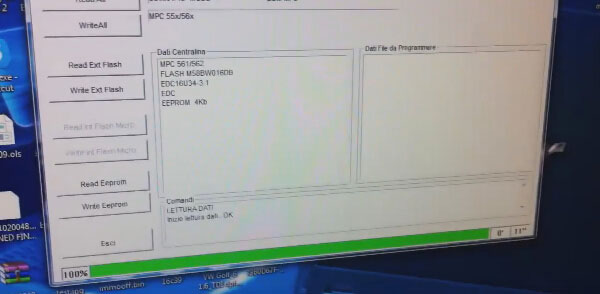
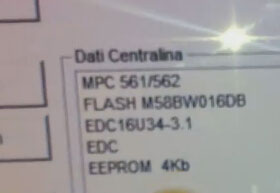


When finished, turn off the switch and exit program


Same procedure applies to all EDC16
In short,
we need flash the ECU with BDM if we have full flash for this ECU…
open ECU and read all with BDM…
must find full flash hw and sw version for this ECU…
when write chose flash,not not all (eeprom and MCU not need).
Note: This method applies to all Bosch EDC16 and Me9 ECUs.
11/11/2016
Fgtech Galletto 4 V54 blocked by Internet Solution
Here is the working solution to Fgtech Galletto 4 V54 master ecu programmer blocked problem.
Question: FGtech V54 blocked help please.
I have Galletto FG tech 4 V54 clone, and blocked for internet update. Someone can help me??? Please help me as to how to download it to version that will make it work, please i need guidelines and url and where to get the lower firmware.
I have Galletto FG tech 4 V54 clone, and blocked for internet update. Someone can help me??? Please help me as to how to download it to version that will make it work, please i need guidelines and url and where to get the lower firmware.
PROBLEM SOLVED
I reinstall the software and drivers en other computer. Run the software and see one banner "Galleto error an ocurred and close." . Reinstall the software (double click in setup,only reinstall software) without erase back installation and drivers. Fgtech galletto locked problem solved. more information see. Enjoy!
I reinstall the software and drivers en other computer. Run the software and see one banner "Galleto error an ocurred and close." . Reinstall the software (double click in setup,only reinstall software) without erase back installation and drivers. Fgtech galletto locked problem solved. more information see. Enjoy!


10/10/2016
Reflash Carprog MCU ARM by Jtag programmer
Here is the tutorial on re-flashing carprog clone Mcu AT91SAM7S256 step by step.
Tool use: Carprog v8.21 firmware
We need the stuff:
1- AT91SAM7S256.bin
2- Jtag programmer
3- Jtag software
We need to prepare the Carprog to connect to Jtag programmer but first the flash need to be erased, the Jtag function in mcu is disabled, you can't connect to the mcu before erase the flash. Remove the AT88SC eeprom from the board, please note where is the pin 1 in eeprom before remove:

Carefully lift the pin 55 (reset) of the mcu and solder a wire and secure it with a small ammount of silicone (you don't want to broke the pin in the process).
Connect the Carprog (with the pin 55 dissconected) to the 12v supply, wait about 10 seconds and connect the wire from pin 55 to Vcc (3.3V) in Carprog:


Wait from 5 to 10 seconds after connect the 12v supply, the flash content will be erased and the Jtag option of the Mcu will be enabled now. If not work leave connected for about 3 to 5 minutes. Disconnect the 12v supply from CarProg full and remove the pin 55 wire from vcc. The pin 55 must remain disconnected until the programming process is done.
Ok, that’s it. I make it; and you try on you risk.
Ok, that’s it. I make it; and you try on you risk.
Subscribe to:
Posts (Atom)